
Introduction
Hey there! If you’re new to my HomeLab series (get caught up here: Homelab Series | What to Expect), you might recall me mentioning XigmaNAS as one of my go-to solutions for a powerful NAS server. In fact, I wrote a detailed guide on how to set it up (check out the step-by-step tutorial here: Set Up NAS with Ease (XIGMANAS)). However, when working with XigmaNAS in my homelab, I’ve always appreciated its flexibility and robust features… but there was one challenge that had me scratching my head during jail setup. That’s what this post is all about.
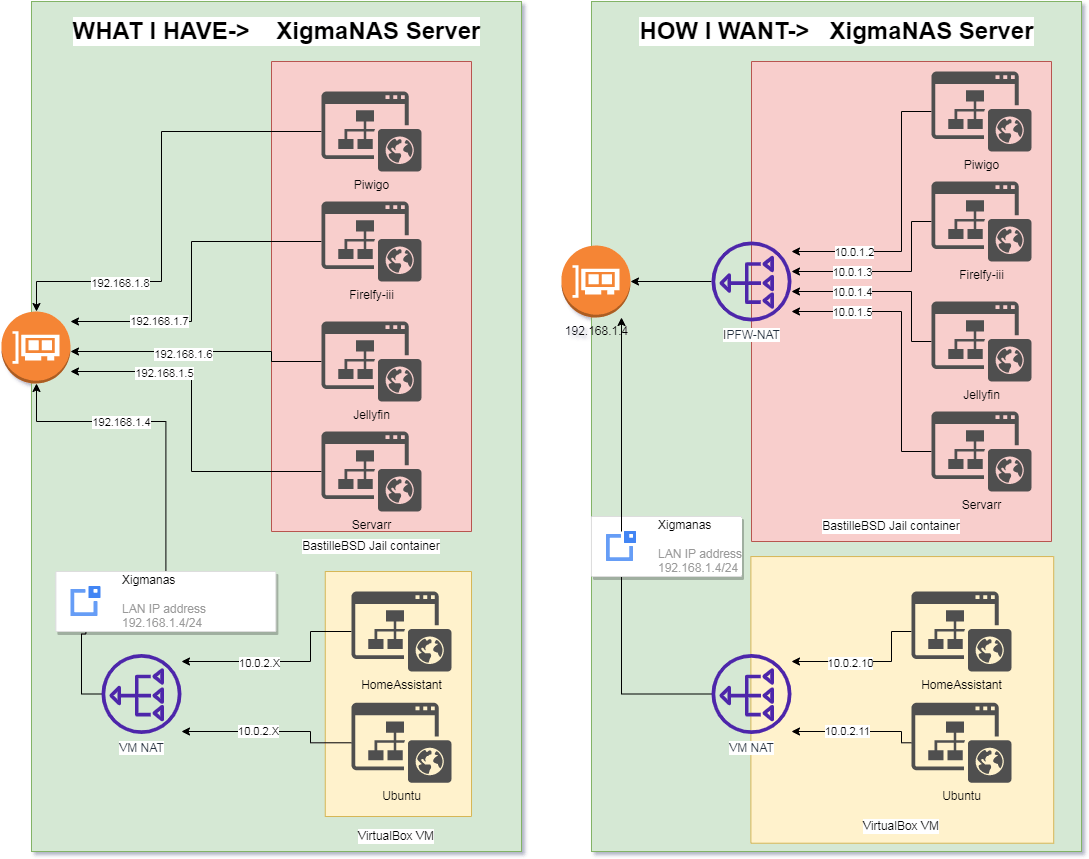
What really got under my skin was managing jails with shared networking. With multiple jails competing for IP addresses on my main network, it became a juggling act to avoid conflicts and keep everything running smoothly. And until XigmaNAS version 13.3, I didn’t even have access to the pfctl binary – which made setting up a loopback or NAT network for jails a real challenge. However If there was a easy way, then I didn’t know about it.
The Solution: Utilizing pfctl and Loopback Interfaces for jail
With the inclusion of the pfctl binary in XigmaNAS 13.3, I saw an opportunity to simplify my setup. By configuring a loop-back interface for the jails and using NAT, I could assign private IP addresses to each jail, removing the strain on my main network and making my environment more scalable and easier to manage.
In this post, I’ll share how I configure NAT-based jails using a loopback interface with pfctl, which has greatly simplified my network management and eliminated the dependency on my network’s available IPs.
Steps to Implement NAT Network Jails
1. Load the Packet Filter Kernel Module
Add the following line to your loader.conf to ensure the Packet Filter (PF) module loads on boot:
pf_load="YES" // Load the packet filter kernel module2. Configure PF and Networking Settings
In your rc.conf, add the following lines to enable PF, logging, and the necessary network settings:
pf_enable="YES"  // Enable Packet Filter
pf_rules="/mnt/pool/services/scripts/pf.conf"  // PF rules location
pflog_enable="YES"  // Enable Packet Filter logging
pflog_file="/mnt/pool/services/logs/pf.log"  // PF logs location
gateway_enable="YES"  // Enable Gateway/NAT feature
cloned_interfaces="lo1"  // Create a loopback interface
ifconfig_lo1="inet 10.10.10.1 netmask 255.255.255.0"  // Set IP for loopback interface
3. Enable IP Forwarding
To allow your system to forward packets between interfaces, add the following to sysctl.conf:
net.inet.ip.forwarding=1 // Enable IP forwarding4. Restart the System
After making these changes, restart your server. Once it reboots, verify that the loopback interface is active with the following command:
$ ifconfigYou should see an interface named lo1 with the IP address 10.10.10.1.
5. Create the PF Rules File
Next, create a persistent storage file for your PF rules, e.g., /mnt/pool/services/scripts/pf.conf. Populate it with the following configuration:
ext_if = "re0"  // External interface name
ext_addr = "192.168.1.250"  // Host's IP address
int_if = "lo1"  // Loopback interface for NAT

table <jails> persist
rdr-anchor "rdr/*"

nat on $ext_if from lo1 to any -> ($ext_if) port 1024:65535 static-port  // Enable internet access for jails

# Example port forwarding rule:
# rdr on $ext_if proto tcp from any to $ext_addr port 8443 -> 10.10.10.4 port 443
Start the PF service:
service pf startIf it fails, double-check your configuration for typos or incorrect paths.
6. Create a Jail
You can create a jail either via the XigmaNAS GUI or command line. Here’s how to do it via CLI:
bastille create -C <jail_name> <release> <jail_IP> <interface>For example:
bastille create -C testjail 12.3-RELEASE 10.10.10.2/24 lo1After creating the jail, restart the PF service:
service pf restartVerify that the jail’s IP is correctly assigned to the lo1 interface by running ifconfig.
7. Test the Configuration
To test the internet connectivity of the jail, SSH into it and run:
pkg updateIf everything is set up correctly, the jail should be able to connect to the internet.
8. Set Up Port Forwarding (Optional)
If you have services inside a jail that need to be accessible from the outside, you can set up port forwarding. For instance, to forward the host’s port 8443 to a jail’s port 443, add the following rule to your pf.conf:
rdr on $ext_if proto tcp from any to $ext_addr port 8443 -> 10.10.10.4 port 443After adding the rule, restart the PF service:
service pf restartYou can now access the jail’s service externally via 192.168.1.250:8443.
Conclusion
By leveraging the PF firewall and a loopback interface, you can efficiently manage jails in XigmaNAS without consuming valuable IP addresses from your main network. This setup provides a scalable solution for running multiple jails, reducing the complexity and potential conflicts of shared IPs.